1. Summary page
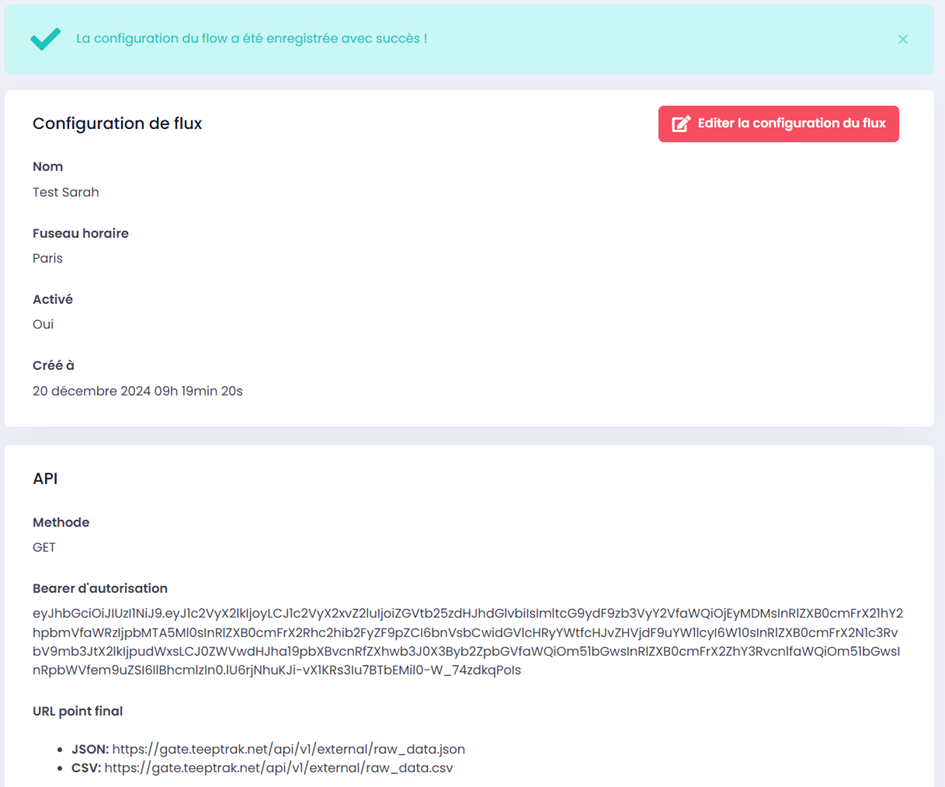
Once the flow configuration is saved, a summary page opens and presents all the information needed to extract the data.
Editing the configuration
You can change the information entered previously by clicking the "Edit the flow configuration" tab.
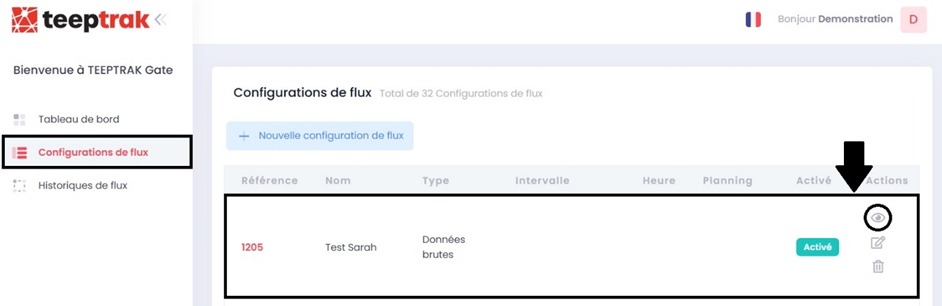
You can also reach this page from the "Flow configurations" tab, by clicking the eye symbol in the "Actions" column of the table.
2. Extraction elements
The extraction conditions of the chosen source are displayed as three mandatory elements to be combined.
Method
GET — the request protocol used to retrieve the data.
Authorisation
Bearer Token — the security key required to access the content.
Endpoint URL
URL in JSON or CSV format:
https://gate.teeptrak.net/api/....json
https://gate.teeptrak.net/api/....csv
3. Important notes
Pagination and request limits
Data is returned in blocks, to guarantee optimal performance.
Request limits
- Maximum: 1 request every 2 seconds per token
- Hourly quota: 500 requests per hour per token
If this limit is exceeded, the API returns a 429 Too Many Requests error.
Recommendation: space your requests at least 8 seconds apart to stay comfortably within both limits.
Results per page
Each request returns a maximum of 2,000 results per page (2,000 rows). Exporting 5,000 results therefore requires several requests, the results being split into blocks of 2,000 rows.
Exception: the product count is limited to 1,000 results per page.
4. Example of a data retrieval
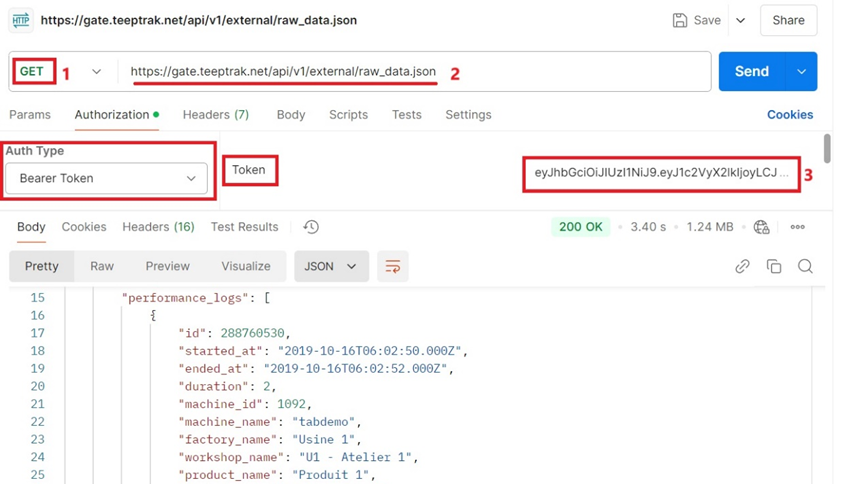
Using the GET method, the Bearer Token authorisation and the URL provided, you can export your data in JSON and/or CSV format.
Procedure with Postman
- Enter the API information in the corresponding Postman fields.
- The data exported in JSON format is displayed in the lower section.
5. Optional parameters and pagination
Filters can be applied to the exports, to refine and optimise your extraction needs.
Using them in Postman
- Click "Params".
- Enter the corresponding keys and values.
- Click "Send" to apply the filter.
List of the available parameters
| # | Parameter | Description |
|---|---|---|
| 1 | page |
Set the page number returned by the API |
| 2 | created_at_gte |
Set the "greater than or equal to" threshold (created at…) |
| 3 | created_at_lte |
Set the "less than or equal to" threshold (created at…) |
| 4 | updated_at_lte |
Set the "less than or equal to" threshold (updated at…) |
| 5 | with_custom_fields |
Allow the custom fields to be displayed |
| 6 | machine_ids |
Filter the request on one or more machines |
6. Raw data — V2 alternative with cursor pagination
Overview
For the raw data API, an optional alternative is available: the Performance Logs V2 API. It offers cursor pagination, which is more robust than the classic page-number pagination: each record is returned exactly once, even if the data changes between your requests.
V2 endpoints:
GET /api/v1/external/performance_logs.json
GET /api/v1/external/performance_logs.csv
GET /api/v1/external/performance_logs/simplified_losses.json
GET /api/v1/external/performance_logs/simplified_losses.csv
Classic V1 endpoints (still available):
GET /api/v1/external/raw_data
GET /api/v1/external/simplified_losses
You can carry on using the classic page pagination or adopt cursor pagination, depending on your needs.
When to use V2 (cursor)?
- You run a regular data synchronisation (daily, hourly, and so on).
- You want to guarantee zero data loss or duplication.
- You handle large volumes and want a CSV export in a single request.
When to stay on V1 (page)?
- You make simple one-off exports.
- You prefer classic page-number pagination.
- Your existing integration works well with V1.
Cursor pagination: how to use it
V2-specific parameters:
| Parameter | Description |
|---|---|
since |
ISO 8601 date for the first request (e.g. 2025-01-01T00:00:00Z). |
cursor |
Pagination key for the following requests. See below. |
limit |
Number of results per page (default: 2000, max: 2000). |
Concept. The cursor is a pagination key guaranteeing that each record is returned exactly once, even if the data changes between your requests. This offers better data integrity than simple page-number pagination.
First request (initial synchronisation)
Send your first request without a cursor, using the since parameter or no parameter at all:
GET /api/v1/external/performance_logs?since=2025-01-01T00:00:00Z
The JSON response includes a meta object containing a next_cursor:
{
  "data": [ ... ],
  "meta": {
    "next_cursor": "eyJ1cGRhdGVkX2F0IjoiMjAyNS0wNi0wMVQxMDoxNTowMC4wMDAwMDBaIiwiaWQiOjJ9"
  },
  "links": {
    "next": "https://gate.teeptrak.net/api/v1/external/performance_logs?cursor=eyJ1cGRhdGVkX2F0Ij..."
  }
}
Following requests (incremental synchronisation)
Save the last next_cursor received. For the next request, use that cursor as a parameter:
GET /api/v1/external/performance_logs?cursor=eyJ1cGRhdGVkX2F0IjoiMjAyNS0wNi0wMVQxMDoxNTowMC4wMDAwMDBaIiwiaWQiOjJ9
The response returns a new next_cursor for the following request. Repeat this cycle until next_cursor is null, which means you have obtained all the available data.
End of the pagination
When meta.next_cursor is null, or when the number of results is lower than the limit, you have retrieved every available record.
To continue the request later, in order to obtain the new data, it is recommended to keep the last non-null cursor.
Error case: lost cursor
If you lose your last saved cursor, send a new request with the since parameter and an approximate date of your last successful synchronisation. You will then retrieve the data from that date onwards.
Complete example of a synchronisation in three requests
1. Initial synchronisation
Request 1: GET /api/v1/external/performance_logs?since=2025-01-01T00:00:00Z
Response: 2000 records + next_cursor = "cursor_ABC"
Save "cursor_ABC"
2. Incremental synchronisation
Request 2: GET /api/v1/external/performance_logs?cursor=cursor_ABC
Response: 2000 records + next_cursor = "cursor_XYZ"
Save "cursor_XYZ"
3. Last incremental synchronisation
Request 3: GET /api/v1/external/performance_logs?cursor=cursor_XYZ
Response: 1500 records + next_cursor = "cursor_qsd"
Save "cursor_qsd"
Synchronisation complete
7. Managing the cursor with Postman (environment variables)
To automate the handling of the cursor in Postman, use environment variables.
Initial setup
- Open Postman and go to "Manage Environments" (gear icon).
- Create or edit your Gate environment.
- Add two variables:
- Key:
cursor| Value: (leave empty) - Key:
token| Value: your Bearer Token
- Key:
First request
In the Params tab, add:
| Key | Value |
|---|---|
since |
2025-01-01T00:00:00Z |
In the Authorization tab, select Bearer Token and enter your token. Click Send.
Updating the cursor after each response
- Go to the Tests tab.
- Add this script to save the
next_cursorautomatically:
if (pm.response.code === 200) {
  const responseData = pm.response.json();
  if (responseData.meta && responseData.meta.next_cursor) {
    pm.environment.set("cursor", responseData.meta.next_cursor);
    console.log("Cursor saved:", responseData.meta.next_cursor);
  } else {
    console.log("End of pagination: next_cursor is null");
  }
}
Following requests
- In the Params tab, remove the
sinceparameter. - Add the
cursorparameter with the value{{cursor}}. - Click Send.
Postman automatically replaces {{cursor}} with the last saved value. After each response, the script updates the variable with the new cursor.
Repeating until the end
Carry on sending the request. The cursor updates automatically after each call. When next_cursor is null, the synchronisation is complete.
8. Structure of the V2 response
JSON response
{
  "data": [
    {
      "id": 1,
      "duration": 300,
      "machine_id": 10,
      "created_at": "2025-01-15T10:30:00Z",
      "updated_at": "2025-01-15T11:00:00Z",
      "custom_fields": {
        "Team": "Morning",
        "Line": "L3"
      }
    }
  ],
  "meta": {
    "next_cursor": "eyJ1cGRhdGVkX2F0IjoiMjAyNS0wNi0wMVQxMDoxNTowMC4wMDAwMDBaIiwiaWQiOjJ9"
  },
  "links": {
    "next": "https://gate.teeptrak.net/api/v1/external/performance_logs?cursor=eyJ..."
  }
}
Key elements
| Element | Description |
|---|---|
data |
Array containing the performance records |
meta.next_cursor |
Cursor for the next request. null at the end of the pagination |
links.next |
Pre-built URL for the next request (optional) |
data.custom_fields |
Object containing the custom fields (if enabled) |
Date format
All dates are returned in ISO 8601 format, in UTC (e.g. 2025-01-15T10:30:00Z).
9. Integration examples with V2
Complete CSV export
To export all the data as CSV in one go:
GET /api/v1/external/performance_logs.csv?since=2025-01-01T00:00:00Z
This single request returns all the results in one CSV file, with no pagination needed. Ideal for one-off exports.
Filtering on machines
To extract the data of specific machines:
GET /api/v1/external/performance_logs?cursor=...&machine_ids=10,20,30
Custom fields
To include the custom fields in the response:
GET /api/v1/external/performance_logs?cursor=...&with_custom_fields=true
They appear in the custom_fields object of each record.